 When I make risotto I usually make extra to make one of my favorite appetizers, Arancini Di Risa (fried risotto balls) the next day. They always are a hit at any party. When I started looking at way to utilize grits; and in particular shrimp and grits. I started thinking in the back of my mind about these lovely golden fried balls that I stuff with a piece of cheese. Why not encase a piece of shrimp in flavorful cheese grits? Better yet, for anyone that doesn't like shrimp we could use pieces of sausage or cheese. I could pair these with a savory cajun style or traditional shrimp sauce. I will leave that up to you. Remember you need to cook your grits with less liquid and let it cool completely to let the starch set up. That will enable the balls to stick together while frying. Ingredients: For the cheese grits - 2 cups stone ground premium white grits 1 1/2 cup chicken broth 1 1/2 cup milk water to achieve proper consistency 1 cup grated sharp white cheddar cheese 1/2 cup grated parmesan cheese 1 cup grated fontina cheese 2 Tbsp. unsalted butter salt For the breading station - 1 cup flour seasoned with salt and pepper 2 eggs beaten 1 cup Panko bread crumbs Directions: 1. Add the butter to a large sauce pan and the grits and toast on medium heat for 10 minutes. Add the chicken broth and milk to the sauce pan and bring to a boil while stirring with a whisk and continue cooking until grits soften (about 15 minutes). Grate the cheeses and add while stirring, season with salt to taste and add water to achieve proper consistency. Let cool. Note: we want a fairly stiff mixture. 2. Clean and devein the shrimp. Cook the shrimp in their shell. Peel and remove the shells then dice into one half to three quarter inch pieces. If you are using sausage, brown the sausage and cut into pieces. 3. Using a small scoop, scoop out some of the grits mixture. using your finger make a hole in the mix and insert the filling. Gather up the mixture to encase the filling and form into a ball. 4. Create a standard breading station, with one container of seasoned flower, one of beaten egg and one of bread crumbs. I prefer Panko Japanese crumbs. 5. Heat up oil for deep frying to 350 degrees F. Roll the balls in the flour shaking of any excess, then in the beaten egg then roll in the bread crumbs. deep fry until golden brown and drain on paper towels. Serve hot with or without a sauce.
0 Comments
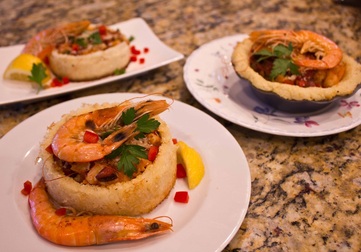 Since I tackled Southern style cheese grits I have looked forward to creating my own version of Shrimp and Grits. I also wanted to talk through my thought process as this dish comes together. My starting place was to mimic Susan's Breakfast Oatmeal but use cheese grits instead of the oatmeal and a shrimp filling. I researched traditional Georgia style shrimp and grits and decided to use smoked sausage, sweet peppers and onion with a sauce. I found a Ukrainian style smoked Kubasa instead of the traditional Andouille but you could substitute a polish smoked sausage. If I fried the sausage I could render out some of the tasty fat in which I could fry the shrimp, peppers and onions. Adding some flour would make a roux that I could flavor with white wine, lemon juice and stock. To keep our shrimp moist we need to brine them, then sauté in the shells to add more shrimp flavor (the shells are packed with flavor). White wine and lemon may not be traditional but pairs great with the shrimp. I presented three different possible grits platforms but you could just use a pile of cheese grits to simplify. The three possible platforms are a mini pie pan, an egg mold and a mini spring form pan. You can try any or find your own. If you are going to use some sort of mold or container, you will need to make a stiffer grit mixture in order for it to retain its shape. Good luck and happy cooking! Ingredients: For the cheese grits - 2 cups stone ground premium white grits 1 1/2 cup chicken broth 1 1/2 cup milk water to achieve proper consistency 1 cup grated sharp white cheddar cheese 1/2 cup grated parmesan cheese 1 cup grated fontina cheese 2 Tbsp. unsalted butter salt For the shrimp mixture - 1 pound large shell on raw gulf shrimp 1/2 pound good quality Ukrainian smoked sausage 1 1/2 cup chicken broth 1/4 cup grated parmesan cheese 1 cup white wine (Pinot Grigio or Sauvignon Blanc 1 cup diced peppers (mixture of red, yellow and poblano) 1/2 medium onion diced 2 cloves garlic chopped 1 lemon 4 Tbsp. butter plus extra to butter the molds 2 Tbsp. flour Directions: 1. Add the butter to a large sauce pan and the grits and toast on medium heat for 10 minutes. Add the chicken broth and milk to the sauce pan and bring to a boil while stirring with a whisk and continue cooking until grits soften (about 15 minutes). Grate the cheeses and add while stirring, season with salt to taste and add water to achieve proper consistency. Let cool. Note: we want a fairly stiff mixture. 2. Preheat oven to 400 degrees F. Butter the molds and sprinkle the molds with the grated parmesan. Press the cooled grits into the molds and up the sides. Bake for 30 minutes. 3. Clean and devein the shrimp. Dice the sausage and sauté with half the butter until the fat begins to render. Add the onions, garlic and peppers and sauté until the onion is translucent. Remove the mixture to a bowl and add the shrimp to sauté until pink. Remove the shrimp and add the sausage mixture back with the flour and butter. Stir until a roux comes together then add the wine and stock to deglaze. Reduce by one half. Peel the shrimp, chop into large pieces reserving some for garnish. Add to the sausage pepper mixture and reduce to the required consistency. 4. Spoon the shrimp mixture into the molds and sprinkle with some parmesan. Garnish with the reserved shell-on shrimp and return to the oven to heat through then serve.  Every now and then I'll come up with an idea that I think is totally original only to find someone has beat me to the punch. Nonetheless here is how I developed the initial idea, changing the method of preparing classic French toast. I have to confess to a serious addiction. Cooking shows! This idea came from watching three of Bobby Flays shows; "Brunch at Bobby’s" showcased Bobby cooking French toast in a waffle iron; in a "Throw-down" episode he sandwiched two pieces of French toast to make stuffed French toast and I remembered another episode making Chicken and Waffles. Suddenly everything came together! But why stop there; the ideas for filling are endless. Make it your own! Ingredients: 8 slices thin sliced firm bread 3 eggs 1 Cup Milk 1 Tbsp. Vanilla 1/2 tsp. cinnamon pinch fresh grated nutmeg 1 tsp sugar Here are some fillings I have thought of or you can come up with your owwn - Filling 1: "New York Cheese Cake" flavored cream cheese (I found some white chocolate), sliced fresh strawberries Filling 2: "Chicken in Waffle" breaded chicken tenders sliced thinly on the bias Filling 3: "The Elvis" peanut butter and sliced banana Directions: Prep your filling(s) and reserve. If you want to try the chicken, make sure it is fully cooked before it goes into the waffle. Heat up your waffle iron. Beat the eggs in a flat wide dish then add milk, sugar, vanilla, cinnamon and nutmeg. Whisk to combine. Brush or spray waffle iron with oil. Dip first four pieces of bread and place on the waffle iron then add filling to the center of each waffle. Do not over stuff! Dip remaining pieces of bread in the egg mixture and position on top of filling. Close the waffle iron and cook until nicely browned. Hint - The steam will start to subside. Serve immediately. Serves two to four depending on appetite.  One of the first dishes I learned to make was French toast. Over the years I have gradually changed the recipe, adding spices, sugar and vanilla to the mix; but with the use of the technique of Translation opens a multitude of new possibilities. Since I am concentrating on form; how can I change the form of French toast? I found some mini spring-form pans at my local kitchen shop and this idea naturally developed. If you do not have these mini pans you may use any small cake pan or even large muffin tins may be used. You may even go a step further and make your own form using a can that has its top and bottom removed (just remember to remove any sharp edges). Let your imagination run wild experimenting with different types of bread or perhaps even using leftover donuts or cinnamon rolls cut into pieces. You can further customize your creation by adding fresh or dried fruits, chopped nuts or even bits of chocolate. Ingredients: 4 Slices of Bread (preferably day old) 4 Large Eggs 1 Cup Half and Half Butter 1 Tbsp. sugar 1/2 tsp. Cinnamon pinch Nutmeg pinch Ground Cloves 1 Tbsp. Vanilla Maple Syrup or your favorite toppings such as fresh strawberries Optional: Dried fruit such as raisins and or chopped toasted nuts Equipment: 2 Mini Spring Form Pans Round Cutter slightly smaller than Spring Form Baking Sheet pan with parchment paper or Silicone baking sheet Cut a circle slightly smaller then the spring form pan out of two of the slices of Bread and dice the rest into ¾ inch cubes. You can optionally cut four circles and use one for the top and one for the bottom but I prefer just two so the dish is a bit more rustic looking. Beat eggs in a bowl with half and half, sugar, cinnamon, nutmeg, cloves and vanilla. Preheat a skillet to medium heat add a small amount of butter. Dip the round cut pieces of bread in the egg mixture and brown on one side. Place the rounds browned side down into the spring form pans. Pour the egg mixture over the bread cubes and fill the spring forms with the moistened bread cubes (if you have cut extra circles for the top, finish with the tops browned side up. Optionally you can also add toasted nuts, chocolate pieces or dried fruit such as raisins to the moistened bread cubes). Bake in a 325 degree oven until done (about 30 minutes). Variation - Use a small circle cutter (I use my cannoli form) to create a well in the center which can be filled with fruit, nuts, and preserves and into which warm syrup could be added. To assemble unmold each and serve with your favorite toppings, or my favorite, a good quality warm maple syrup. Serves two or cut each in half for four smaller servings. 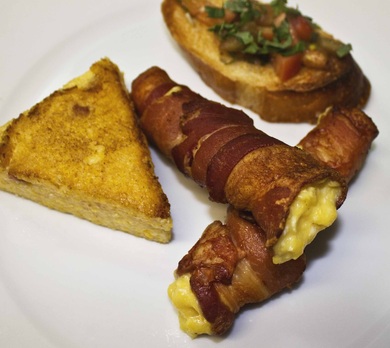 What can be better then bacon and eggs then to give it an Italian twist? The last thing I was talking about in Translation was form (see Translation) and this idea is a great example. This idea came to me because of my love for Italian deserts. While working in Boston, I spent many nights exploring the north end and the many restaurants. One night I was invited to accompany two young ladies to a small Italian bakery to experience the best cannoli’s in Boston in exchange for seeing them safely through the construction of the big dig to the subway. When I started this project, I toyed with the idea of stuffing eggs in cannoli shells for a bacon and eggs dish but then I had an inspiration. Why not use bacon as the cannoli shell and make a dish any bacon lover would love. After some experimentation, I was able to put together my Italian style bacon and egg cannoli’s. I added the parmesan crisps to add additional texture and a punch of flavor. Instead of toast, bruschetta with a touch of fresh basil, garlic, diced heirloom tomato, a great spicy olive oil and sea salt with a touch of red pepper flake. I could add a shaped piece of grilled polenta with some flavoring to give it some interest or maybe some sautéed greens (my wife's idea). Bacon Cannoli This idea seems simple but it packs a great visual statement; crispy tubes of thick sliced bacon filled with a mixture of eggs and cheese. What could be more simple? Ingredients: 8 slices of thick sliced bacon 6 Large Eggs ⅓ Cup grated Parmesan Reggiano 3 Tbsp. Butter Cooking spray Equipment: 4 cannoli molds (tubes) Sheet pan Parchment paper or silicone baking sheet Piping bag and tip (or use a plastic Ziploc bag with the corner cut off) Optional: Sous vide setup and whipped cream canister Spray each of the cannoli molds with cooking spray. Score the sides of the bacon slices to help prevent curling. Loosely roll the bacon around the mold over-lapping the bacon then start the second piece ½ inch under the first and continuing until complete. Place on a parchment covered sheet pan with the end underneath to keep the bacon from un-rolling. Repeat for the rest of the molds. Place the sheet pan in the oven and set the oven to 400° F. Bake until browned (12-18 minutes) and let cool. Carefully remove from the mold and reserve. Prepare either sous vide scrambled eggs or creamy scrambled eggs using both the Parmesan cheese and the butter. If you use the sous vide method add the cheese and butter to the pouch before cooking the eggs. To fill the bacon cannoli’s, put the eggs into a piping bag and pipe into the bacon rounds or if you have whipped cream dispenser, load the eggs into the canister, charge and fill the bacon shells. Serves two large or four smaller servings. Bruschetta Bruschetta is the perfect replacement for toast in this meal. A topping of fresh tomatoes with fresh basil, chopped garlic, red pepper and a sprinkle of finishing salt anointed with extra virgin olive oil helps cut through the fattiness of the bacon and provides a necessary textural element. I have also used chard instead of the basil and tomato if great tomatoes are not available. Ingredients: 2 thick slices of good quality day old Italian bread 1 clove garlic peeled and sliced in half 1 clove garlic finely chopped 1 large or 2 medium heirloom tomatoes 3 to 4 large fresh basil leaves pinch red pepper flakes Finishing salt Slice on the bias 2 one inch thick pieces of Itailian bread and reserve until needed. Dice the tomato and place in a bowl. Stack the basil leaves with the larger leaves on the bottom and roll up like a cigar; then slice into thin strips (chiffonade) and add to the tomatoes. Finely chop one clove of garlic and add to the tomatoes with a pinch of red pepper flakes. Toast or grill the bread until nicely browned and rub with the second piece of garlic. It should melt into the bread. Top with the tomato mixture and top with a pinch of finishing salt and a drizzle of good quaility extra virgin olive oil and serve. Cheese Pancetta Polenta Living in the south for a few years I became acclimated to cheese grits and keeping with the Italian theme I want to utilize pancetta, fontina and pecorino romano cheeses. Switching to Italian polenta made from flint corn creates a more textural mouth feel and the addition of crispy pancetta and authentic Italian cheese adds a salty accent. I like to make my polenta the day before and let it set up overnight. I just need to cut an interesting shape and grill it before serving. Ingredients: 2 cups good quality polenta 3 cups chicken stock 1 cup milk Salt to taste ½ pound pancetta ½ large sweet onion 1 cup grated pecorino Romano 1 cup grated Fontina cheese 1 Tbsp. Olive oil Salt and Pepper to taste Finely dice the pancetta and onion. Heat a skillet on medium heat; add the oil and pancetta and sauté until the fat begins to render. Add in the onions and continue to cook until the pancetta is crispy. Reserve. Add chicken stock and milk to a large stock pot. Taste and correct seasoning and bring to a boil. Whisk in polenta and cook until done. Grate the cheeses and add to the polenta and stir to mix. Add pancetta and onions and blend thoroughly. Taste and correct seasoning. Spray a glass baking dish with non-stick spray. Let the polenta cool then pour into the glass baking dish, smoothing the polenta into a single layer. Refrigerate overnight. Unmold the polenta onto a cutting board and cut into triangles or another desired shape. Grill the polenta and keep warm until ready to use . Creates twelve large triangles. Refrigerate remaining pieces and use within a week  I am always looking for great ways to save some calories without sacrificing taste. Changing the form of a BLT enables me to cut down on the bread and increase the lettuce with a dramatic decrease of calories and I know there are a lot of people out there that want to lose some weight. I'd wish I could say that I was sitting in a restaurant eating a lettuce wrap when inspiration struck but to be honest I was just looking for a low-calorie option for breakfast. When I thought about a breakfast salad everything fell into place; the tomatoes and lettuce the stars and give the bacon and bread a supporting role. All I have to do is wrap everything in the lettuce leaf and I have the same elements in a different yet familiar form, reinforcing the premise that inspiration is based on exposure to multiple ideas and just bringing it all together in an unique way. Ingredients: 4 pounds fresh firm tomatoes 1 head iceberg or butter lettuce 10 pieces thick sliced bacon 3-4 slices of thin sliced dense bread 10 fresh basil leaves 3 tbsp. olive oil Salt and Pepper to taste Optional: Sliced avocado Equipment: Sheet Pans Silpat silicone baking sheet or parchment paper Stockpot Ice-bath Sauté pan Preheat oven to 350° F. Dice the bread into small cubes, drizzle with olive oil, season with salt and pepper and spread out in a sheet pan lined with parchment paper or a silicone baking sheet. Bake until brown and crispy and reserve. Bring a stock pot of water to boil and prepare an ice-bath. Core out the stem end of the tomatoes with a paring knife and cut a small X in the opposite end. Blanch the tomatoes for 30 seconds to loosen the skins then transfer to the ice-bath to cool down. Remove the skins, de-seed and dice into ¼ inch pieces. Reserve. Heat a sauté pan on medium heat. Cut the bacon into ⅓ inch pieces and sauté until crisp. Transfer to a paper towel to dry. Reserve. Roll up the basil leaves length-wise and finely cut into fine ribbons (chiffonade). Core the lettuce and cut lengthwise in half, remove the outer leaves and discard. Separate the lettuce into individual leaves and reserve. In a bowl mix the tomatoes, bacon and basil. Taste and season with salt and pepper. To serve add the tomato mixture on top of the lettuce leaf, sprinkle with croutons and roll. If you like you can slice some avocado and add to the wrap. Serves 4 to 6. 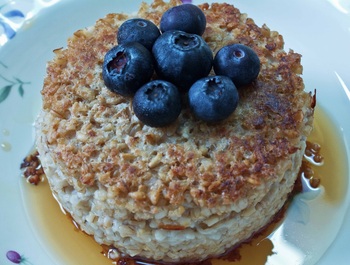 My wife Susan loves her morning oatmeal and sometimes will enjoy it with a poached egg on top that when broken melts into the oatmeal giving it a lovely richness. Using my egg ring molds, I started experimenting first with toasting rounds of oatmeal and adding a poached egg on top. Then inspiration struck, why not make an indentation for the egg and cover it with a lid of oatmeal. Simply altering the form into a cylinder adds a interesting presentation and breaking into the egg inside yields a golden surprise. Toasting the oatmeal in the pan creates a wonderful contrast of textures adding an interesting crunchy element. I can also brulee the sugar with a torch on the top to add more texture and some sweetness or just serve with some maple syrup. Add some berries for a garnish. This dish is only possible if the oatmeal is stiff enough; if the oatmeal is too moist it will not hold its shape when unmolded. This is a great example how form can create a whole new dish that is fun and different. Note: I had some suggestions saying the egg could be replaced with diced fruit, yogurt, jam or whatever you can think of to make it your own! Ingredients: 3/4 Cup Steel-cut precooked Oatmeal (1/2 Cup for base,1/4 Cup for lid) 1 Medium Egg 1 Tbsp. of your favorite Shredded cheese Butter Salt and pepper for seasoning Maple Syrup Optional - Berries for garnish Equipment: 2 Egg Rings ½ Cup metal measuring cup Preheat a ten inch non-stick pan on medium heat Butter both egg rings and put in pan and add small pat of butter in each ring. Place 1/2 cup of oatmeal in first ring and using measuring cup press down to create an indentation with sides. We want a big enough indentation to allow the egg to fit. Add remaining oatmeal (1/4 cup) to other ring and tamp down with measuring cup to create a flat disk. Add a small amount of grated cheese onto the oatmeal. Cook for ten minutes. Break an egg into the indentation and season with salt and pepper. Add a small amount grated cheese to top. Add to the pan a small amount of water (3-4 tablespoons) and cover with lid and cook for 3 minutes or until egg is desired doneness. Depending on the size of the egg, 3 minutes for a soft center to 5 minutes for a hard yolk. To assemble unmold each side and invert side without egg onto side with egg to make a cylinder and plate. Top with brown sugar, maple syrup or your favorite fruit. |
Past Posts (click to select)
Our Mission
How does a good chef think? What is the creative process a chef uses to come up with new and exciting dishes? What do I need to know to enable that creative process? These are the questions I want to explore in this series of articles. As a chef and an avid cookbook collector I am drawn towards ideas and techniques of cooking rather than just a collection of recipes. I believe to grow as a chef, I need to continually learn and hone new techniques along with perfecting each technique I use every day. Whenever I go to a restaurant, whether fine dining, neighborhood pub, avant garde, or even fast food, I continually ask myself how can I do this better, what works and more important, what doesn’t? Feel free to send me comments, ask questions. Together, we can explore and make creative cuisine. Gord StefaniukSpending almost thirty years in the computing field, I was able to travel experiencing a wide variety of tremendous cuisine. First I became a foodie, and when the opportunity arose, I was able to attend culinary school following my passion. I work as a part-time private chef and volunteer time at the community café in North Bend Oregon providing affordable meals in a restaurant setting to my community. Archives
November 2018
Categories
All
|

 RSS Feed
Web Hosting by iPage